【目录】Hexo+NexT+Gemini 搭建博客拥抱舒爽
Pin Young Lv9

1 前言

本文主要是Hexo+NexT搭建博客并且进行主题的配置以及页面的样式优化

本篇文档参考了许多大佬的文章以及配置文件,在此感谢大佬们。

本文参考的文章都会直接给出原文链接或者以注脚的形式标记出处,如有遗漏,欢迎指出。

本文内容会在后续的优化中慢慢补充完整~~


首先在配置Hexo+NexT之前,最好阅读一下 Hexo官方文档NexT使用文档

2 Hexo安装和配置

参考博客:

3 NexT主题优化

3.1 修改文章底部#为图标

修改模板/themes/next/layout/_macro/post.swig,

搜索 rel=”tag”>#,将 # 换成 <i class="fa fa-envira"></i>

3.2 点击出现爱心效果

在/themes/next/source/js/love.js下新建文件love.js,接着把该链接下的代码拷贝粘贴到love.js文件中

1
2
!function (e, t, a) { function n() { c(".heart{width: 10px;height: 10px;position: fixed;background: #f00;transform: rotate(45deg);-webkit-transform: rotate(45deg);-moz-transform: rotate(45deg);}.heart:after,.heart:before{content: '';width: inherit;height: inherit;background: inherit;border-radius: 50%;-webkit-border-radius: 50%;-moz-border-radius: 50%;position: fixed;}.heart:after{top: -5px;}.heart:before{left: -5px;}"), o(), r() } function r() { for (var e = 0; e < d.length; e++)d[e].alpha <= 0 ? (t.body.removeChild(d[e].el), d.splice(e, 1)) : (d[e].y-- , d[e].scale += .004, d[e].alpha -= .013, d[e].el.style.cssText = "left:" + d[e].x + "px;top:" + d[e].y + "px;opacity:" + d[e].alpha + ";transform:scale(" + d[e].scale + "," + d[e].scale + ") rotate(45deg);background:" + d[e].color + ";z-index:99999"); requestAnimationFrame(r) } function o() { var t = "function" == typeof e.onclick && e.onclick; e.onclick = function (e) { t && t(), i(e) } } function i(e) { var a = t.createElement("div"); a.className = "heart", d.push({ el: a, x: e.clientX - 5, y: e.clientY - 5, scale: 1, alpha: 1, color: s() }), t.body.appendChild(a) } function c(e) { var a = t.createElement("style"); a.type = "text/css"; try { a.appendChild(t.createTextNode(e)) } catch (t) { a.styleSheet.cssText = e } t.getElementsByTagName("head")[0].appendChild(a) } function s() { return "rgb(" + ~~(255 * Math.random()) + "," + ~~(255 * Math.random()) + "," + ~~(255 * Math.random()) + ")" } var d = []; e.requestAnimationFrame = function () { return e.requestAnimationFrame || e.webkitRequestAnimationFrame || e.mozRequestAnimationFrame || e.oRequestAnimationFrame || e.msRequestAnimationFrame || function (e) { setTimeout(e, 1e3 / 60) } }(), n() }(window, document);

在\themes\next\layout_layout.swig文件末尾添加:

1
2
<!-- 页面点击小红心 -->
<script type="text/javascript" src="/js/src/love.js"></script>

3.3 文章加密访问

打开themes->next->layout->_partials->head-unique.swig文件,插入这样一段代码:

1
2
3
4
5
6
7
8
9
10
<script>
(function(){
if('{{ page.password }}'){
if (prompt('请输入查看密码') !== '{{ page.password }}'){
alert('密码不正确,请询问主编大大!');
history.back();
}
}
})();
</script>

然后在文章上写成类似这样:

1
2
3
4
5
6
7
8
9
10
title: Hexo+NexT拥抱舒爽
tags:
- Hexo
- NexT
categories:
- Hexo
author: WuGenQiang
password: 123456
date: 2019-03-31 19:01:35
updated: 2019-03-31 19:01:35

3.4 优化深色代码高亮背景

在主题配置文件修改代码高亮背景为深色背景后,当在博客文章上选择代码时,选择到的颜色也为深色,虽然和背景色还是有点点区别,但是不好区分。所以经过一番研究,才有了以下优化教程。

在myblog/themes/next/source/css/_custom/custom.styl中添加以下样式代码:

1
2
3
4
5
6
7
8
9
10
11
12
13
14
15
//page code background-color
.code ::selection {
background: #2593a6;
color: #fff;
}


//gitalk code background-color
.gt-container .gt-comment-content .highlight pre, .markdown-body pre{
background-color: #2d2d2d;
}
.gt-container .gt-comment-content .highlight ::selection {
background: #2593a6;
color: #fff;
}

以上代码优化了所以高亮代码区域,包括gitalk评论区的高亮代码。 这些样式代码是通过浏览器调试而得,如有其它样式的需求,可参考本示例在浏览器中调试。

3.5 解决NexT主题访问慢

3.5.1 方法一:修改外链字体库

注:

现在更改后的速度大不如前了,速度也是ok的,如果想尝试可以更改成中科大的外链字体库,我一直在用中科大的外链字体库,可以参照我的速度来决定是否修改,记录于2019-04-29

当博客使用Hexo搭建在Github Page上的时候,可能会访问慢,有一个原因是因为fonts.googleapis.com加载极慢(虽然可能不慢,比如我的就很满意,速度差不多快,可能是我进行了博文压缩的原因),所以Google了一下,发现了解决方案。
记录:

  • 貌似这种解决方案不能用了,今天2019-04-28博客太卡不知道啥原因,后来F12查看网络延迟,发现是这个中科大的外链字体库出现问题了,不知道什么时候恢复,又恢复了默认状态,因为做过压缩静态资源,所以还是很快。
  • 现在是2019-04-29 15:29 抱着试一试的态度,查看了中科大的外链文字库地址,居然好啦哈哈,完美。

方法:

把在NexT主题的配置文件_config.yml里面的:

1
2
3
4
font:
enable: true
# 外链字体库地址,例如 //fonts.googleapis.com (默认值)
host:

改为:

1
2
3
4
5
6
font:
enable: true
# 外链字体库地址,例如 //fonts.googleapis.com (默认值)
# Uri of fonts host. E.g. //fonts.googleapis.com (Default)
# fonts.lug.ustc.edu.cn是中科大的源,解决Hexo NexT主题访问慢
host: //fonts.lug.ustc.edu.cn

访问速度就很快了!哦耶,当然如果你有更好的解决办法也可以提啊

效果演示:

image

3.5.2 方法二:博文压缩

这里我来分享以下如何压缩,参考 实现博文压缩

3.5.3 方法三:双服务器托管

还有一种方法就是采用Coding+Github双服务器托管Hexo博客,这样访问速度会更快!
如果想进行这样的操作,可以参考我的文章:Coding+Github双服务器托管Hexo

3.6 去掉顶部黑线

打开themes\next\source\css\_custom\custom.styl

1
2
//添加代码:
.headband {display:none;}

保存刷新一下,黑线就没有了。

3.7 设置点击头像返回主页

打开themes\next\layout\_macro\sidebar.swig

1
2
3
4
5
6
7
8
//添加代码:
+ <a href="/">
<img class="site-author-image" itemprop="image"
src="{{ url_for( theme.avatar | default(theme.images + '/avatar.gif') ) }}"
alt="{{ theme.author }}" />
+ </a>

//这里注意找到中间代码,添加a标签就行了,中间不用修改。

如图:

image

重新部署hexo s,刷新页面点击头像即可返回主页。

3.8 实现3d动态标签云

效果如图所示:
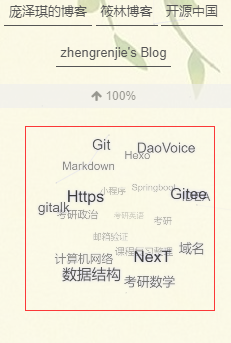
image

可参考github上标签云使用教程完成本操作,下面是我的步骤:

3.8.1 安装标签云hexo-tag-cloud插件

1
npm install hexo-tag-cloud@^2.* --save

3.8.2 配置sidebar.swig文件

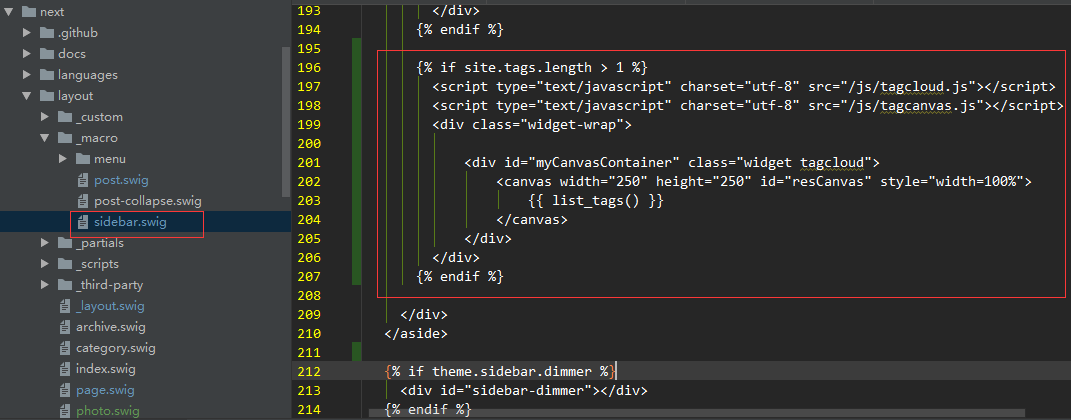
打开next/layout/_macro/sidebar.swig,输入:

1
2
3
4
5
6
7
8
9
10
11
{% if site.tags.length > 1 %}
<script type="text/javascript" charset="utf-8" src="/js/tagcloud.js"></script>
<script type="text/javascript" charset="utf-8" src="/js/tagcanvas.js"></script>
<div class="widget-wrap">
<div id="myCanvasContainer" class="widget tagcloud">
<canvas width="250" height="250" id="resCanvas" style="width=100%">
{{ list_tags() }}
</canvas>
</div>
</div>
{% endif %}

位置如图放置,可以根据你的需要放置,下图是我的位置:

image

重新hexo s一下,就可以出现我刚刚那个3d标签云啦!

3.9 设置标题样式(为浅蓝色)

进入主题目录 themes\next\source\css\_common\components\post\ 修改 post.styl 文件(博文的样式表),在配置的后面添加下面的代码:

1
2
3
4
5
6
7
8
9
10
11
12
13
14
15
16
17
18
/*添加下面的CSS代码来修改博文标题样式*/
.page-post-detail .post-title {
font-size: 26px;
text-align: center;
word-break: break-word;
font-weight: $posts-expand-title-font-weight
background-color: #b9d3ee;
border-radius:.3em;
line-height:1em;
padding-bottom:.12em;
padding-top:.12em;
box-shadow:2px 2px 7px #9fb6cd;
+mobile() {
font-size: 22px;
}
}
/*添加上面的CSS代码来修改博文标题样式*/
@import "post-expand";//这行以上复制就可以啦,此行不用复制

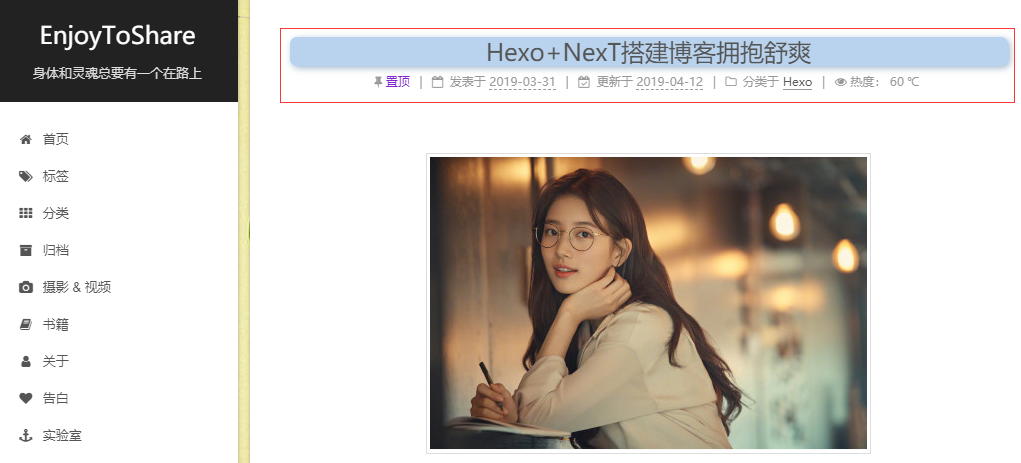
效果如图所示:

image

注:如果想把主页标题样式一同修改,可以把 .page-post-detail 去掉即可。

效果如图所示:

image

3.10 设置文章封面图片(文章内不显示)

在博客首页的时候会显示文章的封面图片,进入这篇文章的详细页面后,将不显示这张图片。
操作如下:

3.10.1 修改post.swig文件

修改 \themes\next\layout_macro\post.swing 文件,将下面代码复制进去:

1
2
3
4
5
{% if post.summary_img  %}
<div class="out-img-topic">
<img src={{ post.summary_img }} class="img-topic">
</div>
{% endif %}

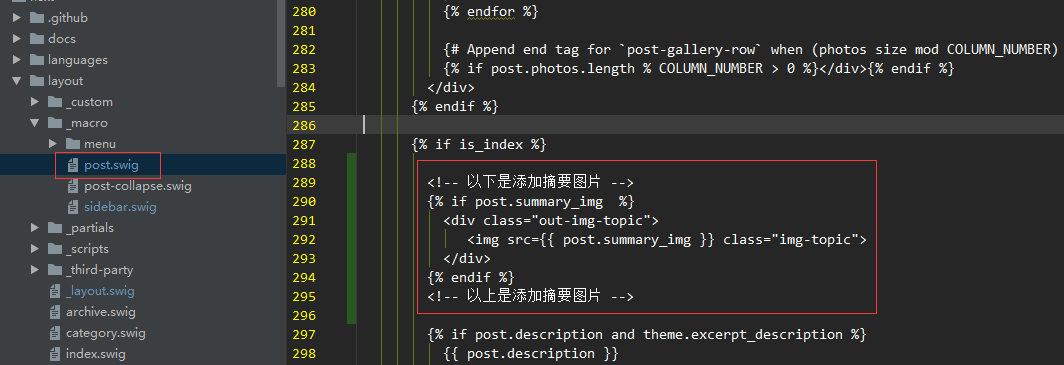
添加到下图所示的位置:

image

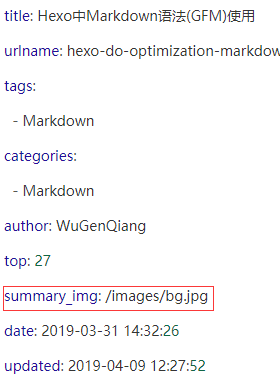
这样的话,就可以使用summary_img: imageurl来设置文章封面了。

3.10.2 添加summary_img字段

在新建的文章添加一个字段属性:summary_img,summary_img的值是图片的路径,如下图,但是请注意一下,亲测,本地图片要放在images目录下,网络图片随意啊
image

3.11 修改阅读全文颜色

修改themes\next\source\css\_custom\custom.styl文件,添加:

1
2
3
4
5
6
7
8
9
10
11
12
// 修改按键(button)样式
.btn {
color: #49b1f5;
background: #fff;
border: 2px solid #49b1f5;
}
// 按键(button)点击时样式
.btn:hover {
border-color: #49b1f5;
color: #fff;
background: #49b1f5;
}

即可,颜色自己定义。

3.12 修改主题页面布局为圆角

3.12.1 方法一

/themes/next/source/css/_variables/custom.styl文件种添加如下代码(以Gemini风格为例):

1
2
3
4
5
6
7
8
9
10
11
12
13
14
15
// 修改主题页面布局为圆角
// Variables of Gemini scheme
// =================================================
@import "Pisces.styl";
// Settings for some of the most global styles.
// --------------------------------------------------
$body-bg-color = #eee
// Borders.
// --------------------------------------------------
$box-shadow-inner = 0 2px 2px 0 rgba(0,0,0,.12), 0 3px 1px -2px rgba(0,0,0,.06), 0 1px 5px 0 rgba(0,0,0,.12)
$box-shadow = 0 2px 2px 0 rgba(0,0,0,.12), 0 3px 1px -2px rgba(0,0,0,.06), 0 1px 5px 0 rgba(0,0,0,.12), 0 -1px .5px 0 rgba(0,0,0,.09)
$border-radius-inner = initial
$border-radius = initial
$border-radius-inner = 15px 15px 15px 15px;
$border-radius = 15px;

3.12.2 方法二

\themes\next\source\css\_variables\Gemini.styl文件中直接添加:

1
2
3
// 修改主题页面布局为圆角
$border-radius-inner = 15px 15px 15px 15px;
$border-radius = 15px;

即可

3.13 修改友链样式

点此链接查看:Hexo+NexT修改友链样式

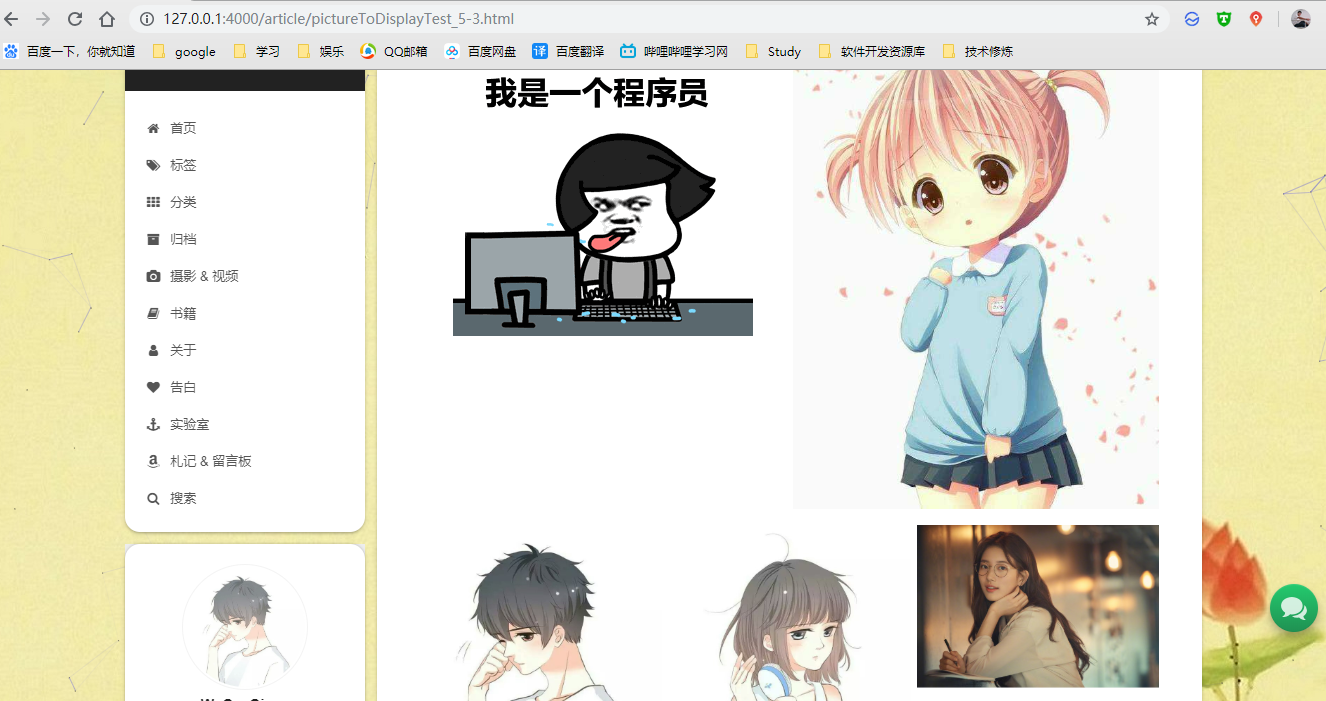
3.14 博文图片模式

新建博文,设置 type: picture,使用 { % gp x-x % }…{ % endgp % } 标签引用要展示的图片地址,如下所示:

1
2
3
4
5
6
7
8
9
10
11
12
13
14
15
16
17
18
19
title: 测试图片展示
tags:
- Picture
- Hexo
urlname: pictureToDisplayTest_5-3
categories:
- Hexo
author: WuGenQiang
type: picture
date: 2019-04-14 18:02:40
updated: 2019-04-14 18:02:40
---
{% gp 5-3 %}
![](https://raw.githubusercontent.com/wugenqiang/PictureBed/master/pictures/070.gif)
![](https://raw.githubusercontent.com/wugenqiang/picGo/master/pictures/013.jpg)
![](https://raw.githubusercontent.com/wugenqiang/picGo/master/pictures/003.jpg)
![](https://raw.githubusercontent.com/wugenqiang/picGo/master/pictures/004.jpg)
![](https://raw.githubusercontent.com/wugenqiang/picGo/master/pictures/20190404142303.png)
{% endgp %}

图片展示效果:
{ % gp 5-3 % }:设置图片展示效果,参考 themes\next\scripts\tags\group-pictures.js ,5-3 的意思就是5张图片将会按照这种布局来展示,Next 提供了多张图片的多种布局,你可以随意选择,请到官网查看:https://theme-next.org/docs/tag-plugins/group-pictures

注意点

主题目前首页可以正常显示设置的图片效果,但是点击进入后显示效果丢失,所以需要修改一下themes\next\source\css\_common\components\tags\group-pictures.styl 中的以下样式:

1
2
3
4
5
6
.page-post-detail .post-body .group-picture-column {
//float: none;
margin-top: 10px;
//width: auto !important;
img { margin: 0 auto; }
}

效果参照我的测试博文页面:测试5-3图片展示

效果如图所示:

image

3.15 隐藏特定文章

点此链接查看:Hexo+NexT隐藏特定文章

3.16 增加分享功能

3.16.1 方法一

编辑主题配置文件_config.yml,添加/修改字段baidushare,值为 true 即可。

1
2
# 百度分享服务
baidushare: true

效果不太适合我,所以选择了第二种方法

3.16.2 方法二

git bash输入:

1
2
$ rm -rf themes/next/source/lib/needsharebutton
$ git clone https://github.com/theme-next/theme-next-needmoreshare2 themes/next/source/lib/needsharebutton

然后在/themes/next/_config.yml中,搜索 needmoreshare2,修改如下:

1
2
3
4
5
6
7
8
9
10
11
12
13
14
15
16
needmoreshare2:
enable: true
postbottom:
enable: true
options:
iconStyle: box
boxForm: horizontal
position: bottomCenter
networks: Weibo,Wechat,Douban,QQZone,Twitter,Facebook
float:
enable: false # 这里是浮动分享,我没有设置
options:
iconStyle: box
boxForm: horizontal
position: middleRight
networks: Weibo,Wechat,Douban,QQZone,Twitter,Facebook

效果如下:

image

3.17 鼠标选取文字提示版权信息

点此链接查看:Hexo+NexT选取文字提示版权信息

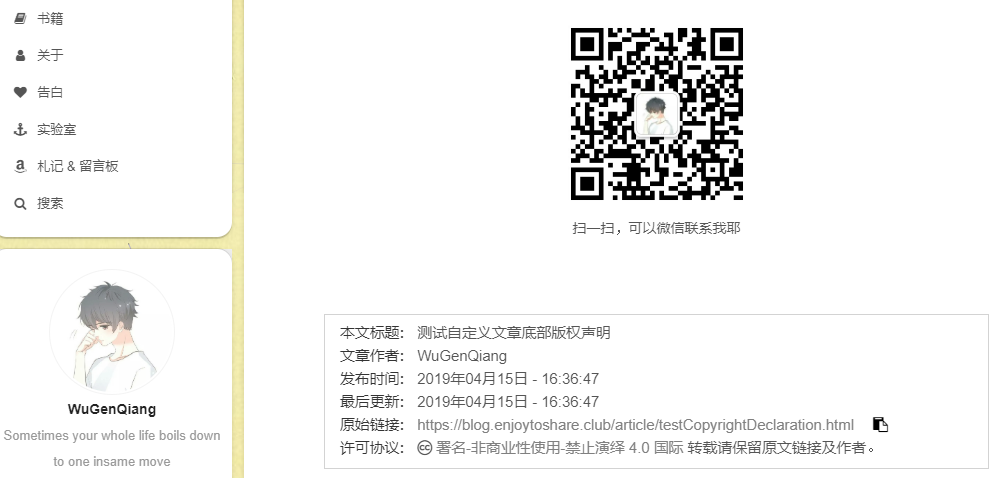
3.18 自定义文章底部版权声明

themes/next/layout/_macro/ 下添加 my-copyright.swig ,内容如下:

1
2
3
4
5
6
7
8
9
10
11
12
13
14
15
16
17
18
19
20
21
22
23
24
25
26
27
28
29
30
31
32
33
{% if page.copyright %}
<div class="my_post_copyright">
<script src="//cdn.bootcss.com/clipboard.js/1.5.10/clipboard.min.js"></script>

<!-- JS库 sweetalert 可修改路径 -->
<script type="text/javascript" src="https://code.jquery.com/jquery-3.2.1.min.js"></script>
<script src="https://cdn.bootcss.com/sweetalert/2.1.2/sweetalert.min.js"></script>
<link rel="stylesheet" type="text/css" href="https://cdn.bootcss.com/sweetalert/1.1.2/sweetalert.min.css">

<p><span>本文标题:</span>{{ page.title }}</a></p>
<p><span>文章作者:</span>{{ theme.author }}</a></p>
<p><span>发布时间:</span>{{ page.date.format("YYYY年MM月DD日 - HH:mm:ss") }}</p>
<p><span>最后更新:</span>{{ page.updated.format("YYYY年MM月DD日 - HH:mm:ss") }}</p>
<p><span>原始链接:</span><a href="{{ url_for(page.path) }}" title="{{ page.title }}">{{ page.permalink }}</a>
<span class="copy-path" title="点击复制文章链接"><i class="fa fa-clipboard" data-clipboard-text="{{ page.permalink }}" aria-label="复制成功!"></i></span>
</p>
<p><span>许可协议:</span><i class="fa fa-creative-commons"></i> <a rel="license" href="https://creativecommons.org/licenses/by-nc-nd/4.0/" target="_blank" title="Attribution-NonCommercial-NoDerivatives 4.0 International (CC BY-NC-ND 4.0)">署名-非商业性使用-禁止演绎 4.0 国际</a> 转载请保留原文链接及作者。</p>
</div>
<script>
var clipboard = new Clipboard('.fa-clipboard');
clipboard.on('success', $(function(){
$(".fa-clipboard").click(function(){
swal({
title: "",
text: '复制成功',
html: false,
timer: 500,
showConfirmButton: false
});
});
}));
</script>
{% endif %}

3.18.2 新建my-post-copyright.styl文件

themes/next/source/css/_common/components/post/ 下添加 my-post-copyright.styl,内容如下:

1
2
3
4
5
6
7
8
9
10
11
12
13
14
15
16
17
18
19
20
21
22
23
24
25
26
27
28
29
30
31
32
33
34
35
36
37
38
39
40
41
42
43
44
45
.my_post_copyright {
width: 85%;
max-width: 45em;
margin: 2.8em auto 0;
padding: 0.5em 1.0em;
border: 1px solid #d3d3d3;
font-size: 0.93rem;
line-height: 1.6em;
word-break: break-all;
background: rgba(255,255,255,0.4);
}
.my_post_copyright p{margin:0;}
.my_post_copyright span {
display: inline-block;
width: 5.2em;
color: #333333; // title color
font-weight: bold;
}
.my_post_copyright .raw {
margin-left: 1em;
width: 5em;
}
.my_post_copyright a {
color: #808080;
border-bottom:0;
}
.my_post_copyright a:hover {
color: #0593d3; // link color
text-decoration: underline;
}
.my_post_copyright:hover .fa-clipboard {
color: #000;
}
.my_post_copyright .post-url:hover {
font-weight: normal;
}
.my_post_copyright .copy-path {
margin-left: 1em;
width: 1em;
+mobile(){display:none;}
}
.my_post_copyright .copy-path:hover {
color: #808080;
cursor: pointer;
}

3.18.3 修改post.swig文件

修改 themes/next/layout/_macro/post.swig ,如下:
end post body之后根据你个人需要放置位置,添加以下代码:

1
2
3
4
5
<div>
{% if not is_index %}
{% include 'my-copyright.swig' %}
{% endif %}
</div>

3.18.4 修改post.styl文件

打开 themes/next/source/css/_common/components/post/post.styl 文件,在最后一行增加代码:

1
@import "my-post-copyright"

3.18.5 修改post.md文件

设置新建文章自动开启 copyright ,即新建文章自动显示自定义的版权声明,设置 ~/scaffolds/post.md 文件,如下:

1
2
3
4
5
---
title: {{ title }}
date: {{ date }}
copyright: true #新增,开启
---

3.18.6 新建文章测试

发现新建简单文章可以显示,之前的文章不能显示
效果图:
image

3.19 增加词云

方法比较简单,加个js脚本就好了,至于加载哪里都无所谓了,就放在标签云的页面。
就加在标签的那个页面好了。

打开themes\next\layout\page.swig找到:

1
{% if page.type === "tags" %}

将下面这段代码:

1
2
3
4
5
6
7
8
9
<div class="tag-cloud">

<!-- <div class="tag-cloud-title">
{{ _p('counter.tag_cloud', site.tags.length) }}
</div> -->
<div class="tag-cloud-tags" id="tags">
{{ tagcloud({min_font: 16, max_font: 16, amount: 300, color: true, start_color: '#fff', end_color: '#fff'}) }}
</div>
</div>

换成下面这段代码:

1
2
3
4
5
6
7
8
9
10
11
12
13
14
15
16
17
18
19
20
21
22
23
24
25
26
27
28
29
30
31
32
33
34
35
36
37
38
39
40
41
42
43
44
45
46
47
48
49
50
51
52
53
 <div class="tag-cloud">
<!-- <div class="tag-cloud-title">
{{ _p('counter.tag_cloud', site.tags.length) }}
</div> -->
<div class="tag-cloud-tags" id="tags">
{{ tagcloud({min_font: 16, max_font: 16, amount: 300, color: true, start_color: '#fff', end_color: '#fff'}) }}
</div>
</div>
<br>

<script type="text/javascript">
var alltags=document.getElementById('tags');
var tags=alltags.getElementsByTagName('a');

for (var i = tags.length - 1; i >= 0; i--) {
var r=Math.floor(Math.random()*75+130);
var g=Math.floor(Math.random()*75+100);
var b=Math.floor(Math.random()*75+80);
tags[i].style.background = "rgb("+r+","+g+","+b+")";
}
</script>

<style type="text/css">
div#posts.posts-expand .tag-cloud a{
background-color: #f5f7f1;
border-radius: 6px;
padding-left: 10px;
padding-right: 10px;
margin-top: 18px;

}

.tag-cloud a{
background-color: #f5f7f1;
border-radius: 4px;
padding-right: 5px;
padding-left: 5px;
margin-right: 5px;
margin-left: 0px;
margin-top: 8px;
margin-bottom: 0px;

}

.tag-cloud a:before{
content: "📜";
}

.tag-cloud-tags{
text-align: left;
counter-reset: tags;
}
</style>

就好啦

3.20 开启文章目录

点此链接查看:Hexo博客NexT主题开启文章目录和调整样式

3.21 图片点击实现全屏查看

点此链接查看:Hexo文章中图片点击实现全屏查看

3.22 修改内容区域的宽度

点此链接查看:Hexo之修改内容区域的宽度

3.23 DaoVoice实现在线联系

点此链接查看:DaoVoice实现在线联系

3.24 打赏功能

点此链接查看:Hexo的NexT主题打赏功能

3.25 加入评论功能gitalk

点此链接查看:Hexo NexT 加入评论功能gitalk

3.26 获取网易云音乐外链

点此链接查看:Hexo获取网易云音乐外链

3.27 开启emoji表情

如何让 markdown 可以解析 emoji 呢?实际上我们发现,在编辑器中输入 :smile: 并没有表情出现,是为什么呢?
这是 markdown 渲染引擎的问题 ,将 markdown 变成 html 的转换器叫做markdown渲染器 。 Hexo默认是采用 hexo-renderer-marked ,这个渲染器不支持插件扩展,当然就不行了,还有一个支持插件扩展的是 hexo-renderer-markdown-it ,这个支持插件配置,可以使用 markwon-it-emoji 插件来支持emoji。需要将原来的 marked 渲染器换成 markdown-it 渲染器。所以我们可以使用这个渲染引擎来支持emoji表情。

3.27.1 安装新的渲染器

首先进入博客目录,卸载hexo默认的 marked 渲染器,安装 markdown-it 渲染器,运行的命令如:

1
2
$ npm un hexo-renderer-marked --save
$ npm i hexo-renderer-markdown-it --save

之后安装 markdown-it-emoji 插件 :

1
$ npm install markdown-it-emoji --save

据说 hexo-renderer-markdown-it 的速度要比 Hexo 原装插件要快,而且功能更多

3.27.2 编辑站点配置文件

这里的站点配置文件是指位于博客根目录下的_config.yml,编辑它,然后在末尾添加如下内容:

1
2
3
4
5
6
7
8
9
10
11
12
13
14
15
16
17
18
19
20
21
22
23
24
25
# Markdown-it config
## Docs: https://github.com/celsomiranda/hexo-renderer-markdown-it/wiki
markdown:
render:
html: true
xhtmlOut: false
breaks: true
linkify: true
typographer: true
quotes: '“”‘’'
plugins:
- markdown-it-abbr
- markdown-it-footnote
- markdown-it-ins
- markdown-it-sub
- markdown-it-sup
- markdown-it-emoji ## add emoji
anchors:
level: 1
collisionSuffix: 'v'
# If `true`, creates an anchor tag with a permalink besides the heading.
permalink: true
permalinkClass: header-anchor
# The symbol used to make the permalink
permalinkSymbol: 

说明一下:

  • level:生成 Heading ID 的标题等级
  • collisionSuffix:Heading ID 重复时,数字的后缀
  • permalink:’true’,则创建一个锚标记,除标题外还有一个固定链接
  • permalinkClass:用于固定链接锚标记的样式
  • permalinkSymbol:用于固定链接标记的符号

若想更改 permalinkSymbol 里面符号,可以参考:permalinkSymbol

注:如果不想显示 permalinkSymbol 的符号,可以改 permalink: truepermalink: false 即可

  • html:定义文档中的HTML内容是否应转义或传递给最终结果。

    1
    2
    html: true # 不转义 HTML 内容
    html: false # 转义 HTML 内容,使标签作为文本输出
  • xhtmlOut:定义解析器是否将导出完全兼容XHTML的标记。

    1
    2
    xhtmlOut: true # 必须使用完全的 XHTML 代码,换行必须为 <br/>
    xhtmlOut: false # 不必必使用完全的 XHTML 代码,换行可以为 <br>
  • breaks:使源文件中的换行符被解析为
    标记。每次按Enter键都会创建换行符。

    1
    2
    breaks: true # 每次会车换行相当于一个 <br/> 标签
    breaks: false # Pa每次会车换行会被忽略
  • linkify:解析器能够将直接粘贴到文本中的链接内联。

    1
    2
    linkify: true # 类似链接的文本,作为链接输出
    linkify: false # 类似链接的文本,依然作为文本输出
  • typographer:可以替换常见的排版元素。

    1
    2
    typographer: true # 替换常见的排版元素
    typographer: false # 不替换常见的排版元素
  • quotes:单引号、双引号如何被替换

    1
    2
    quotes: '“”‘’' # 'single'、"double" 变成 ‘single’、“double”
    quotes: '«»“”' # 'single'、"double" 变成 “single”、«single»

3.27.3 使用方法

Emoji 中找到你想要的表情,然后点击复制即可
或者你想发一个笑脸 😄 也可以直接输入笑脸对应的 emoji 编码 :smile:

3.28 修改``代码块自定义样式

打开 \themes\next\source\css\_custom\custom.styl ,向里面加入:(颜色可以自己定义)

1
2
3
4
5
6
7
8
9
10
11
// 以下修改``代码块自定义样式
// Custom styles.
code {
color: #ff7600;
background: #fbf7f8;
margin: 2px;
}
.highlight, code, pre {
border: 1px solid #d6d6d6;
}
// 以上修改``代码块自定义样式

效果图如下:
image

3.29 添加PDF

参考博文:Hexo NexT主题内添加pdf 插件

3.30 实现博文压缩

在站点的根目录下执行以下命令:

1
2
$ npm install gulp -g
$ npm install gulp-minify-css gulp-uglify gulp-htmlmin gulp-htmlclean gulp --save

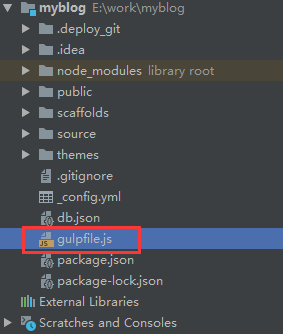
在如下图所示,新建 gulpfile.js ,并填入以下内容:

image

1
2
3
4
5
6
7
8
9
10
11
12
13
14
15
16
17
18
19
20
21
22
23
24
25
26
27
28
29
30
31
32
33
var gulp = require('gulp');
var minifycss = require('gulp-minify-css');
var uglify = require('gulp-uglify');
var htmlmin = require('gulp-htmlmin');
var htmlclean = require('gulp-htmlclean');
// 压缩 public 目录 css
gulp.task('minify-css', function() {
return gulp.src('./public/**/*.css')
.pipe(minifycss())
.pipe(gulp.dest('./public'));
});
// 压缩 public 目录 html
gulp.task('minify-html', function() {
return gulp.src('./public/**/*.html')
.pipe(htmlclean())
.pipe(htmlmin({
removeComments: true,
minifyJS: true,
minifyCSS: true,
minifyURLs: true,
}))
.pipe(gulp.dest('./public'))
});
// 压缩 public/js 目录 js
gulp.task('minify-js', function() {
return gulp.src('./public/**/*.js')
.pipe(uglify())
.pipe(gulp.dest('./public'));
});
// 执行 gulp 命令时执行的任务
gulp.task('default', [
'minify-html','minify-css','minify-js'
]);

生成博文是执行 hexo g && gulp 就会根据 gulpfile.js 中的配置,对 public 目录中的静态资源文件进行压缩。

但是注意:

在hexo 最新3.8版本里面安装gulp 进行压缩。发现会进行报错。百思不得其解,发现是因为网络上的gulp教程均适用于 gulp 4.0 版本以下 ,如果是安装了最新的gulp 4.0 版本的情况下,则就会进行报错。解决办法在下面有说明
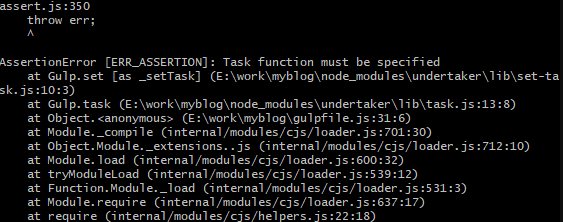
image

解决办法参考:https://master.compassionate-raman-1e7f63.netlify.com/posts/74d69307.html

由于我的gulp4..0所以配置文件改为:

1
2
3
4
5
6
7
8
9
10
11
12
13
14
15
16
17
18
19
20
21
22
23
24
25
26
27
28
29
30
31
32
33
34
var gulp = require('gulp');
var minifycss = require('gulp-minify-css');
var uglify = require('gulp-uglify');
var htmlmin = require('gulp-htmlmin');
var htmlclean = require('gulp-htmlclean');
// 压缩 public 目录 css
gulp.task('minify-css', function() {
return gulp.src('./public/**/*.css')
.pipe(minifycss())
.pipe(gulp.dest('./public'));
});
// 压缩 public 目录 html
gulp.task('minify-html', function() {
return gulp.src('./public/**/*.html')
.pipe(htmlclean())
.pipe(htmlmin({
removeComments: true,
minifyJS: true,
minifyCSS: true,
minifyURLs: true,
}))
.pipe(gulp.dest('./public'))
});
// 压缩 public/js 目录 js
gulp.task('minify-js', function() {
return gulp.src('./public/**/*.js')
.pipe(uglify())
.pipe(gulp.dest('./public'));
});
// 执行 gulp 命令时执行的任务
// gulp 4.0 适用的方式
gulp.task('build', gulp.parallel('minify-html', 'minify-css', 'minify-js'
//build the website
));

image

欧克,成功

4 自定义域名

4.1 绑定个人域名

参考博文:Hexo博客绑定个人域名

4.2 开启HTTPS

参考博文:Hexo博客自定义域名开启HTTPS

4.3 Coding+Github托管Hexo

参考博文:Coding+Github双服务器托管Hexo

欧克,成功

5 SEO推广

刚搭建完博客,可能你会发现你发表的文章在谷歌或者百度都搜索不到,因为需要进行SEO优化的,什么是SEO,顾名思义,SEO即(Search Engine Optimization):汉译为搜索引擎优化,下面来总结一下SEO优化的方法,让自己的博文能在谷歌百度上搜索到。

5.1 生成sitemap

添加站点地图sitemap
Sitemap用于通知搜索引擎网站上有哪些可供抓取的网页,以便搜索引擎可以更加智能地抓取网站。
安装sitemap站点地图自动生成插件hexo-generator-sitemaphexo-generator-baidu-sitemap,用于生成sitemap,在git Bash中执行以下命令:

1
2
npm install hexo-generator-sitemap --save
npm install hexo-generator-baidu-sitemap --save

修改站点配置文件
将sitemap文件添加到站点配置文件_config.yml中,并修改url字段的值,其值默认为http://yoursite.com。
在站点配置文件 _config.yml中添加如下:

1
2
3
4
5
6
sitemap:
path: sitemap.xml
baidusitemap:
path: baidusitemap.xml

url: https://blog.enjoytoshare.club

配置好后,执行hexo g 就能在网站根目录(public目录)中生成sitemap.xml 和 baidusitemap.xml了;其中第一个是一会要提交给google的,后面那个看名字当然就是提交给Baidu的了;

5.2 添加蜘蛛协议

网站通过Robots协议告诉搜索引擎哪些页面可以抓取,哪些页面不能抓取。robots.txt 通常存放于网站根目录(public目录)。由于我们每次hexo clean都会清空public,着实不方便,我们都知道source目录下的文件通过hexo g命令会转换成public中的文件,所以为了方便起见,我们把robots.txt文件放在source目录下,我的 robots.txt 内容为:

1
2
3
4
5
6
7
8
9
10
11
12
13
14
15
User-agent: *
Allow: /
Allow: /archives/
Allow: /categories/
Allow: /tags/
Allow: /notes/
Allow: /love/
Allow: /page/
Disallow: /js/
Disallow: /css/
Disallow: /fonts/
Disallow: /vendors/
Disallow: /fancybox/
Sitemap: https://blog.enjoytoshare.club/sitemap.xml
Sitemap: https://blog.enjoytoshare.club/baidusitemap.xml

其中Allow后面的就是你的menu
请自行将blog.enjoytoshare.club改成自己的域名,然后hexo g提交一下

5.3 打开SEO

在主题配置文件_config.yml中找到:

1
seo: false

将其设置为true

5.4 提交站点到百度

5.4.1 开启百度自动推送

在主题配置文件_config.yml中添加如下:

1
baidu_push: true

5.4.2 将网站链接提交到百度

百度搜索引擎非验证提交入口
正式提交入口

正式提交需要验证,有三种验证方式,我选择Html标签验证,在themes\next\layout \ _partials\head.swing中添加验证代码(根据你实际验证代码来决定这里写什么):

1
<meta name="baidu-site-verification" content="bqaja5HAOz" />

image

添加后运行hexo d -g将改动提交,然后点击完成验证,通过即可。

5.4.3 登录百度站长平台

5.5 提交站点到Google

首先保证你要能翻墙出去,连到谷歌,如果没有VPN,可参考下面网址获取:工具盒子

5.5.1 提交博客域名

打开Google Search Console
根据提示注册好之后,添加你的博客域名。

5.5.2 进行站点验证

我选择了备用方法中的HTML 标记,将给出的元标记复制到\themes\next\layout\ _partials \head\head.swig文件中。

添加后运行hexo d -g将改动提交,稍后就可以验证成功了。

5.5.3 提交站点地图

还记得我们刚才创建创建sitemap.xml文件吧,现在它要派上用场了。点击左侧工具栏的站点地图

5.6 验证站点是否被收录

在搜索引擎搜索框输入site:your.domain可以查看域名是否被该搜索引擎收录,用户可以使用各大搜索引擎站长工具提交个人博客网址。

5.6.1 验证谷歌收录

1
site:blog.enjoytoshare.club

域名换成你自己的,谷歌是一定支持的,不过你需要翻墙VPN!如果没有,可参考下面网址获取:工具盒子,如果没有找到你的博客说明没有被收录!

5.6.2 验证百度收录

1
site:blog.enjoytoshare.club

域名换成你自己的,如果没有找到你的博客说明没有被收录!
百度收录是真的需要时间

今天是2019-04-12,很幸运,今天查看了一下site:blog.enjoytoshare.club,发现已经收录了,很开心!nice
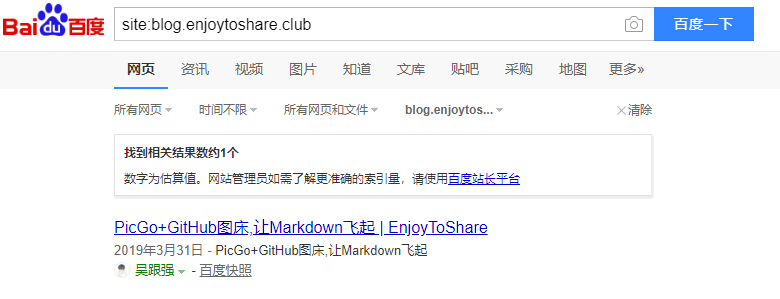
image


到这里,应该博客超级炫了吧哈哈,如果觉得以上操作很多想直接跳过这些配置,可以参考我的博客源码:CS-BlogSource